Boost Gauge
Installation FAQ
The boost gauge is
perhaps the most common, and overlooked mod in the DSM community.
I have yet to see a full up
FAQ on it's installation;
at least on the 2g cars. I can't count how many times some poor
newbie (yes my hand is raised :) asked the questions: Where do I
tap my gauge? Where do I get power for the light? Well look no
further. I will help you new guys as best I can since everyone
else (my self included sometimes) takes for granted the most
often performed mod as if the knowledge of how to do it were
implanted in your brain at the time of sale (ya, SATAN teaching
you a mod . . . DOH). Anyway here we go:
Parts:
- A Boost Gauge - Do I need to
explain this!!
- A-Pillar Mounting Cup - Or whatever
other way you want to mount it.
- Vinyl hose - To connect the gauge
to the engine.
- Barb "T" - To tap the FPS
hose. You will just have to find one that fits snug;
shouldn't be hard at all.
- Sealant (either or both options
should work)
- Teflon tape - To get a good
seal on the brass fitting.
- RTV - To REALLY get a good
seal on the brass fitting and maybe to attach the
A-Pillar mount.
- Adhesive
- Double Side Tape - Good
luck with this. Nothing sticks to that A-Pillar.
- Shoe Goo - Or equivalent.
This was offered up by John Chin. He says it works well.
- Super Glue - Same concept
as the Shoe Goo but a little too permanent for
me.
- Automotive push connectors
- OK they are not adhesives but they are how I
attached the A-pillar mount.
- Wire - something flexible and small
which can handle the current (i.e. 22 AWG stranded
speaker wire).
- Wire Taps - to tap into your cars
power for the gauges light.
- C-clamp - Used if you are gluing
the A-pillar mount.
Tools:
- Wire cutters - to cut your hose and
wiring.
- Knife - to cut a hole in your
steering boot for the hose.
- Wire Hanger - to help you fish the
hose through the fire wall.
- Open ended wrenches - to tighten
the brass fitting on the gauge.
- Drill - Only if you plan on making
holes to mount the gauge; I did (and I actually used a
screwdriver :).
- Crimper or pliers - to crimp the
wire taps.
Installation Steps:
- Decide where you are going to mount
the gauge and how (I'm going to assume and A-pillar
cup:).
- Trim the A-pillar mount so that it
fits the way you want it to.
- If you're going to drill holes to
attach the cup drill them now.
- Ensure proper fitting of the cup
and A-pillar and alignment of the holes you've drilled.
- Cut a hole on the steering boot.
- Run the hose through the firewall.
- Tap the Fuel Pressure Solenoid.
- Attach the hose to the gauge. (You
might want to test the setup by starting the car at this
point).
- Make the connections for the light
under the dash.
- Run the wire to the cup and attach
it to the gauge light (Again I suggest testing it now).
- Attach the cup (make sure the hose
and wire are already going through the cup :).
- Slide the gauge in place.
- Hide the hose and wire.
Explanations:
What Kind of Boost Gauge
should I get?
Preferably one which reads from -30inHg
to 20psi (or 30psi). If you get one that only goes to 15psi you
might as well save your money for the next gauge you're gonna
buy, cause 15psi just won't last you long. Also before you buy
your gauge make sure that you will actually be able to hook it to
your car. What I mean is I bought an Autometer gauge which came
with hard plastic tubing and compression fittings.
The problem was that the Hard plastic
tubing wouldn't seal on a barb "T" and I simply could
not find a "T" with barb fittings on the top of the
"T" and a pipe tread on the bottom to accept the
compression fitting supplied with the gauge. Fine you say, just
get some vinyl hose; it will seal on a barb "T".
Correct, but the compression fittings that came with the gauge
were too small on the hose side. Again you ask: why don't you get
a brass fitting with a barb on the end to attach to the gauge.
Well they simply don't supply them in the mid-Ohio area. I looked
everywhere and there simply are no barb fittings which fit the
boost gauge (1/8" NPT).
OK then get a compression fitting that
fits the gauge and the hose. Not so easy again. First of all, the
vinyl hose collapses and doesn't seal in the compression fitting,
and besides that it took me 3 days of searching to find a
compression fitting that 1) fit the right size vinyl hose AND 2)
fit the gauges 1/8" NPT. That's right I did find it.
I solved the collapsing problem by
inserting a hollow plastic tube into the vinyl hose (actually it
is one of a "T" which I cut off :). Then I could
tighten down the compression fitting CAREFULLY and seal it
without the hose itself collapsing. I still used RTV to make
sure.
The point of all this blabbing to to
make you realize that just because they sold you the gauge
doesn't mean: 1) it has the parts needed to hook it to your car
and 2) that they even sell the parts separately to make it work
on your car. So the $15 I saved buying an Autometer locally was
NOT worth it when I could have bought a gauge from any of our
favorite net speed shops with the right parts already included.
But remember: ASK WHAT CONNECTIONS ARE SUPPLIED.
Where should I mount it?
I used the standard A-Pillar Mounting
Cup. You don't have to use one of these but it is the most common
mounting method. OK here are the facts: NO ONE MAKES ONE THAT
FITS. That's right even the cup which three (3) people told me
was the best one to get at the shootout, still didn't fit right
(they did admit that to me at the time also). Apparently all of
the 2g cups are the same way. Have no fear though. If you file
down about a 1/4" off the top of the cup it will fit very
well. Other locations people have mounted their gauge was in the
driver side vent. It looks nice if done right but no one sells a
face plate so you will have to roll your own.
Where do I tap the gauge into?
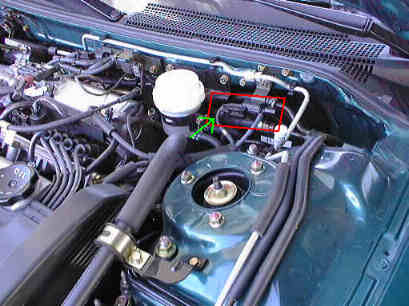 This has been a frequent question on the digest.
I have found in my searches that the best place is the fuel
pressure solenoid (FPS). Which is under the hood on the driver
side of the firewall (red box). From what I've read this gives
the best results from the standpoint of stability (needle doesn't
vibrate) and accuracy. The hose you want to tee into is the one
on the passenger side of the solenoid (green arrow). If you
follow it you will see that it goes to the intake manifold. Do
not tap into the hose which goes to the Fuel Pressure Regulator
(Drivers Side). Besides getting inaccurate readings, you may
alter the signal which gets sent to the regulator and you DO NOT
want that.
This has been a frequent question on the digest.
I have found in my searches that the best place is the fuel
pressure solenoid (FPS). Which is under the hood on the driver
side of the firewall (red box). From what I've read this gives
the best results from the standpoint of stability (needle doesn't
vibrate) and accuracy. The hose you want to tee into is the one
on the passenger side of the solenoid (green arrow). If you
follow it you will see that it goes to the intake manifold. Do
not tap into the hose which goes to the Fuel Pressure Regulator
(Drivers Side). Besides getting inaccurate readings, you may
alter the signal which gets sent to the regulator and you DO NOT
want that.
How do I get the
boost hose there?
Anyway you can. Seriously
though, most people seem to send it through the firewall via the
steering boot. Have no fear . . . you won't lose steering if you
cut this boot. All you need is a small hole to fish the hose
through. I placed the hole at the 9 o'clock position in the boot.
I then used an unwrapped wire hanger to fish the hose through. I
did this by sticking the curly end of the hanger in the hose
(this holds very well) and then fishing the hanger through the
boot. If you bend the hanger right and fish it through carefully
the hanger should appear somewhere reachable from the top of the
engine (versus crawling underneath). Then just start fishing the
hose around the way you want it (without the hanger :) until it
is in place at the FPS. I made sure that the hose could not rub
against the steering column as I turned the wheel by keeping it
taught with wire ties..
How do I tap the
FPS?
I used a simple tee. To
avoid cutting the hose I slipped about a 2" piece of my
vinyl hose on to the FPS and then attached it to the tee. The
original hose which goes to the manifold is put on the other side
of the tee. I then attached the boost gauge hose to the remaining
part of the tee. All of the connections were secured with wire
ties to ensure they wouldn't work loose.
How do I get the
gauge to light up with the dash?
First things first. Don't
bother trying to make the gauge dim. You can do it fairly easily
(though not as easily as you might first think:), but it will not
be bright enough especially if your like me and keep your dash
fairly dim. Even on the brightest setting the boost gauge is
barely bright enough even for me. Therefore I will be describing
how to hook the light up so that it is only on when the dash
board is lit and with no dimming control.
You shouldn't worry too much about what size wire to use since
the gauge doesn't really draw a lot of current, BUT, better safe
then sorry. 22AWG should be more then enough. You may even want
to use an inline fuse but that may be over kill since the place
we are taping power from is fused itself.
- There is a junction block that is
just above your left foot above and behind the fuse box.
B-66 is the wiring harness we are interested in.
- Pull the connector from there; it
is quite hard to pull that connector. I cut my hand one
of the many times I pulled it out. There is a
"button" on the inner side of the harness (i.e.
between B-66 and B-51). You don't "have" to
pull the connector but it make the following steps much
easier.
Now you are holding
connector B-66 in your hand and asking "now
what". Well  find wires #2
and #14 (black and green-white respectively). Tap into
those with your trusty wire taps (or splice if you really
must). It doesn't matter which wire you connect to which,
but I put the two black wires together and the white and
green-white together.
find wires #2
and #14 (black and green-white respectively). Tap into
those with your trusty wire taps (or splice if you really
must). It doesn't matter which wire you connect to which,
but I put the two black wires together and the white and
green-white together.
Plug the connector
back in.
- Turn on your lights and make sure
your gauge and dash lights up.
- Turn your dimmer and make sure the
gauge doesn't dim but your dash does.
- You're done. Turn your lights off
and go to the next step
How do I hide the
hose and wire as it travels to the boost gauge?
Well here I am going to
have to assume you are using an A-Pillar mount. First of all
route the hose and wire to the bottom of the dash where it meets
the driver side door frame (near the fuse box). What I did was
carefully pull back the rubber molding on the driver side between
the frame and the dash (picture soon). You don't have to remove
it. Just pull it back enough to stuff the hose and wire in there.
Push the molding back in place and you no longer have to look at
it. To hide the hose and wire as they passed into the A-Pillar
mount I just cut a notch in the pod on the bottom near the back
of the pod. This allowed the hose and wire to go into the pod
with as little of them visible as possible. I think a better job
could be done than I did so think about it before you do it. Hey
I can't give you all the answers . . . that wouldn't leave you
any fun :)
How do I mount the A-Pillar Pod
Good luck. The supplied mounting tape
stuck to every part of my car except the A-Pillar molding, and
YES I CLEANED IT SMART ASS :) So I decided to bite the bullet and
drill holes. The stock A-pillar panel is only $7, so if you want
to replace it to sell your car don't worry too much about it.
Anyway, I drilled two holes in the mounting cup and then used it
as a stencil to mark the holes for the A-Pillar. After drilling
them I used some black automotive style push connectors (is this
the right name??) to secure the cup. It works very well, looks
professional and is removable. So get over it and drill some
holes.
John Chin
e-mailed me to tell me that Shoe Goo works really well also. He
says that it is rather soft, is very sticky, and allows removal
of the mount should you need to do so. The residue also
scrapes/rubs off really easy as well. Let me if any of you try
this.
I have since changed my
mount to a Lo-Tek dual A-pillar replacement. This very sweet part
replaces the entire panel and looks so stock it would fool
anyone. More info on this will be posted soon so check back again
soon.
Other Hints:
- Leave enough wire and hose in the
mounting cup so that you can pull the gauge back out.
- Make sure you can disconnect the
gauge from the hose and light. This way you don't have to
deal with the hose and wiring if you should need to
remove the gauge for any reason. Trust me its a good
idea.
Acknowledgements:
The photo of the FPS was supplied by Tim
Romero. Thanks Tim