 Installation Steps:
$15 Upper Intercooler Pipe FAQ
UPDATE: I have since found a radiator hose with two 45 degree bends which looks much better, is easier to install and will help flow a bit. One of the big benefits of this hose is that it allowed me to cut the stock tube even shorter and then port it out a bit. You would be surprised how small the pipe is at the BOV. Pictures will be forth coming. I am having trouble finding a part number which everyone else will be able to cross reference but I'm trying. For now all I have is a part number which didn't help me at all but here it is incase it will help you: GDY395. The reason this didn't help me is every shop I called said that Goodyear part numbers aren't 3 digits for hoses. Maybe it isn't a Goodyear number after all.
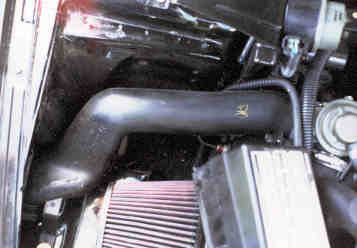
OK here it is. The much anticipated Upper IC Pipe FAQ. I have receive the most e-mail about this mod and finally decided to finish it. As you know the Upper IC Pipe in our 2g cars is less than ideal. I did some rough measurements of the pipe and found that there is approximately a 50% decrease in area between the IC outlet and the BOV. Not to mention two serious bends in that necked down region. So how do we fix this problem you ask. Simple replace that narrow piece of . . .er . . . pipe with something better. First of all you should already know that to perform this mod you MUST have replaced the airbox with some sort of cone type filter. Otherwise you just won't have the room. You also SHOULD have installed a better BOV. No point having better flow if the air is just going to be purged by a weak BOV. Now that you have those two items taken care of let's move on.
Andrew Bienhaus has performed this mod without removing the pipe from the car. The important thing to remember here is that you have to be VERY CAREFUL about the dust your create while cutting the pipe. You do not want it getting to the turbo. So you must saw carefully and thoroughly vacuum the dust out of the pipe before you do anything else. I don't thing plastic dust melting in your pistons or valves is a good thing. Remember you do this mod my way or his way at your own risk. If you could afford the car you can afford common sense . . . I hope :)
Parts:
Tools:
Installation Steps:
This should be fairly easy since I know you've already replaced your BOV with a better one or are about to . . . right???
Be careful here. Don't just yank on the wires. You will not be a happy camper if you break something here.
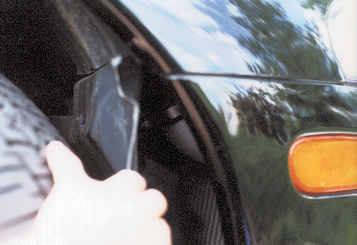 Unbolt the right wheel
well molding.
Unbolt the right wheel
well molding.You could remove the molding if you wanted, but it isn't really necessary. Just remove enough bolts and molding screws to pull the fender lining away like shown in the picture.
Save this clamp as you can re-use it to attach the radiator hose.
There are two bolts
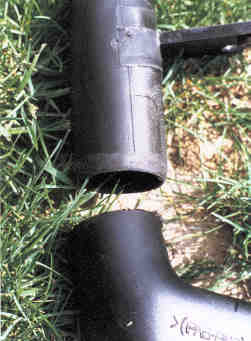
holding the pipe to the frame just. If you look at the
picture below of the pipe off the car you can see the
tang extending down just to the left of the BOV. On the
car it will be just below and right of the BOV. If you
have big hands you might consider getting a friend or
small child to do it. Better yet if you have one of those
socket attachments that is flexible (like a plumbing
snake) those work best. Mine was a crappy one but it
helped a lot.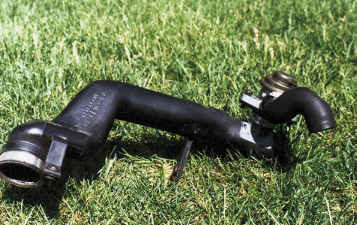
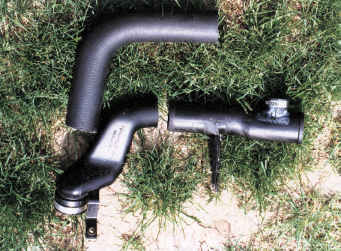
As you can see the
hose matches the shape of the pipe fairly well. The trick
is to lay the hose on top of the pipe and line it up so
that it matches the shape as best you can. Then mark the
place on the pipe that you want to cut AND the place on
the hose you want to cut. Don't forget to leave about a
2" over lap on the BOV side. Leaving a little extra
on the IC side is not a bad idea as you can always trim
it.
 Reduce the outer
diameter of the cut end.
Reduce the outer
diameter of the cut end.This helps a lot with fitting the hose over the IC pipe.
By reshaping the pipe to a smoother transition you are smoothing out the path the air has to travel . . . and that has to be good :)
Like I said line up the hose with the pipe so that you are mimicking the pipe. Then cut the hose (accounting for overlap) so that it matches the shape and length of the stock pipe.
A final picture is being developed. It should be here soon.